Showing posts with label gift ideas. Show all posts

Monday, January 4, 2016

Favorite Gifts: Kitchen

Over the last few years I have received a number of cooking items that I LOVE and I want to share a few of them with you. These are all items that I have personally received as a gift or that I gift to my own friends on a regular basis.

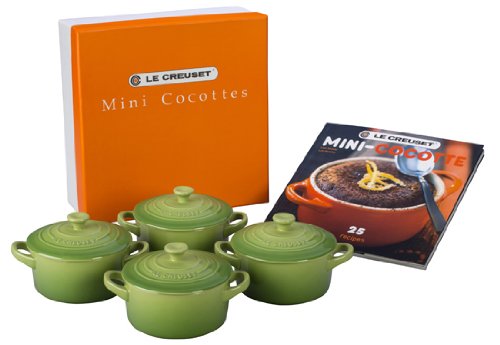
Matt got me these for Christmas and I CANNOT wait to use them! I also love that the set came with a cookbook especially for the small cooking vessels. 

Salt Block Cooking Cookbook and a Salt block! 
What a unique cooking experience. I have only done non-heat on my salt block. It is SUPER powerful! 

 I actually just recently bought this for myself and I LOVE IT. Like that the grocery list is attached! so practical and CUTE 

This is BY FAR my favorite cheese knife brand. 

Who wouldn't want to get a beautiful walnut cutting-board that is perfect to display your yummy cheese??? If you purchase from this site you are also supporting a Veteran owned business!

This is a GREAT book with over 100 things that you can make and give as gifts. My plan is to make a few of these items with close friends throughout the year. 
 Love this new cookbook hat I got for Christmas. I like that it is divided into monthly sections so the recipes that you are making are seasonal. I also really like the headings on each recipe which outlines if the dish is Freezer friendly, make-ahead friendly, kid friendly... 
 

Friday, June 12, 2015

Father's Day Gift Ideas


  1. How interesting are these great Shywood wood-frame sunglasses. you can even get polarized lenses!
  2. Love a tool that will help with that Honey-do-list! I think that my hubby might need this Kreg Jig Pocket Hole System.
  3. How cute is this fishy keychain from etsy! Love that you can get all of your kiddos names on it. I'm a sucker for a personalized gift!
  4. Speaking of a personalized gift... I'm a HUGE fan of Shutterfly Coffee Mugs that you can personalize with family photos. I get these all the time for family members and Matt has two!
  5. This year my hubby started shaving with a razor again... This razor set is SUPER nice
  6. if you hubby or Dad does shave how neat to make a Rosemary Mint Shaving Cream!
  7. And for technology... I like this DIY iPad stand
  8. If you are really looking to DIY a gift this is a cute Father's Day clock!!!
Additionally I'm a huge fan of he Bespoke men's Subscription boxes! The best part is though that you do not have to get a full subscription... if there is a certain box that catches your eye you are able to make a stand alone purchase!


Monday, December 8, 2014

Dare to Give Handmade: Bread & Butter

Today is part three of the Dare to DIY series and I LOVE the theme of this week! 
 
Dare to Give Handmade!
 
I think that giving a gift that is handmade is something that really sticks with people these days and today I'm going to share my go-to hostess gift. It is SOOO easy!


BAM! See that... Yes it is bread & butter... "Gourmet" handmade flavored butter, to be exact!

Whipped Honey Butter, Whipped Berry Butter, & Whipped Garlic Butter! YUMMY. To make the butter I used my mini food processor to mix:

- HONEY BUTTER: 1 Stick of butter at room temperature & 2T Lavender Honey
- BERRY BUTTER: 1 Stick of butter at room temperature & 1 container of raspberries
- GARLIC BUTTER: 1 stick of butter at room temperature & 5 cloves garlic, minced


I also included a loaf of (fresh) french bread that I cut in half and wrapped with butcher paper, bakers twine and added an ornament.

All of the items are placed in a basket that I purchased from homegoods!

To me it is the perfect gift!!! You get to eat the yummy butter and bread (P.S. - the berry butter on the pancakes is AMAZING!!!) You get an ornament to hang on your tree & a basket to use for those organization projects which are sure to be a part of your New Year's Resolutions!

SOOO easy!

Be sure to see what the organizers of this fun Dare to DIY challange made...

Katja at Shift Ctrl Art
Michelle at Decor and the Dog.
Rachel at Maybe Matilda.

Thursday, May 9, 2013

Packing for a work trip w/ Stella and Dot

A few weeks ago I hosted a Stella and Dot Trunk show and Look what arrived yesterday!!! My new Stella and Dot bags!!!


They arrived JUST in time for my work trip... in fact I am on the aircraft as we speak! It is a short trip (only two nights)... my boss is so wonderful and understood that logistically as a nursing mom that it would be difficult to take a week long trip and the destinations are remote so pumping and keeping the milk cold would have been difficult... SO as a result I am only participating in the Germany portion on the trip and will fly commercial home on Saturday.

Anyway... As soon as the bags arrived I started packing. The large Getaway bag fit EVERYTHING that I needed for the trip! Event with out the extension zipper undone.

The clothes were rolled and placed in the bottom... 


Make-up went into the cute pouf that I received as a hostess gift...

Toiletries went into the Hang on Travel Case

I just love all of the colorful patterns! YAY!!! this made my day!

Thursday, March 21, 2013

DIY Burp Cloths

I'm here today to share with you one of my go-to Baby gifts! Homemade Burp cloths!

When preggers with Hunter I ran across this great MADE tutorial and instantly pinned it on Pinterest. Before Hunter was born I purchased a ton of fabric and cloth diapers to create my own burp cloths for Hunter.

One of the best tips that I have are to actually purchase a set of light flannel blankets (I like the Carter Sets)


These are typically about $12.00 for FOUR blankets and I like that they are all coordinating! It makes for a much more put together gift...

Now for some fun burp cloth making...

Get out your supplies...

Iron your fabrics

Get your sewing machine ready... I use the Brother PC-420PRW Project Runway Edition Sewing Machine that my parents got for me for Christmas two years ago. I LOVE my machine! It is so easy to use and believe me I am a sewing rookie!

Next, I fold over the fabric to make a flat/clean edge and iron down...

I sew that flattened edge on the center of the "cloth diaper", cut the rest of the fabric to form a strip down the middle, fold and iron to form a straight edge.

Sew down second edge and sew top and bottom to the cloth diaper. 
I continue your other coordinating fabrics to make other matching burp cloths... I like to make at least three. 


These always make fabulous gifts... I like to pair it with a diaper cake made out of Honest Diapers and some of Hunter's favorite things! (The burp cloths are in the box on the bottom!)