Showing posts with label Kitchen. Show all posts

Monday, January 4, 2016

Favorite Gifts: Kitchen

Over the last few years I have received a number of cooking items that I LOVE and I want to share a few of them with you. These are all items that I have personally received as a gift or that I gift to my own friends on a regular basis.

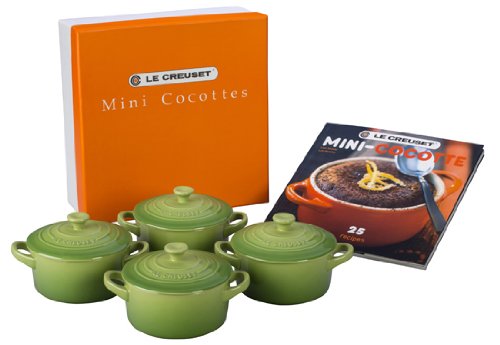
Matt got me these for Christmas and I CANNOT wait to use them! I also love that the set came with a cookbook especially for the small cooking vessels. 
Salt Block Cooking Cookbook and a Salt block! 
What a unique cooking experience. I have only done non-heat on my salt block. It is SUPER powerful! 

 I actually just recently bought this for myself and I LOVE IT. Like that the grocery list is attached! so practical and CUTE 

This is BY FAR my favorite cheese knife brand. 

Who wouldn't want to get a beautiful walnut cutting-board that is perfect to display your yummy cheese??? If you purchase from this site you are also supporting a Veteran owned business!

This is a GREAT book with over 100 things that you can make and give as gifts. My plan is to make a few of these items with close friends throughout the year. 
 Love this new cookbook hat I got for Christmas. I like that it is divided into monthly sections so the recipes that you are making are seasonal. I also really like the headings on each recipe which outlines if the dish is Freezer friendly, make-ahead friendly, kid friendly... 
 

Sunday, November 22, 2015

Kitchen "Refresh" Reveal!

About a month ago we embarked on a little kitchen "Refresh" 

Here is what our kitchen looked like before...


and here is what it looks like now after a new coat of paint, countertops, backsplash, and sink!


Here is the section where we removed a cabinet... I cannot wait to get some chunky wooden shelves in here! 


Until the shelves go up it is a good place for the Advent Calendar that I made last year! I just realized I never shared it before!

So there are still a few things to do but for now I'm happy with the progress that was made! 

Wednesday, October 21, 2015

Kitchen: BEFORE

Today will be the kick-off for our kitchen "refresh" and I am SOOO excited. Here is a look at what the kitchen currently looks like:

Lots of pink and tan... I'm so excited to say goodbye to the tan walls and pink counters....

but most of all I cannot wait to get rid of the cracked sink that started it all!

Today this cabinet will be going byebye...  so that the counter can be updated when the granite team comes tomorrow morning.

The plan is to tile the entire wall and install chunky wooden shelves.

Oh and I bet that you are wondering what I settled on for the counter and back-splash after posting this poll on the blog... I went with the Herringbone Marble. More specifically we purchased this Bergamo Herringbone from Home Depot


I'm slightly obsessed with it and think that it pairs perfectly with the white cabinets and the soon to be black counters.

Tuesday, September 22, 2015

Kitchen "refresh": Tile poll

We have a crack in our under-mount sink so new sink means new countertops... you know I looked and looked and looked for a replacement PINK countertop to match our current one and I was soooo sad that I just couldn't find a perfect match... So I've decided to go with something new... So sad...

No really I am SOOOOOO happy to be getting rid of the pink!!!! I HATE IT!

I wish that we were at the point where we were ready for a FULL kitchen remodel but we're not. In reality we are about 4-5 years down the road on that one. Soooo it is "refresh" time... we are going to get a new stainless steel sink, new countertops, and backsplash.

One thing that I need to keep reminding myself is that this is not my forever kitchen and that I need to keep costs LOW. This was hard this weekend as I was walking through a stone warehouse drooling over all of the gorgeous marble.

To save some money I settled on a Honed Absolute Black Granite countertop but I need some help in the tile backsplash department! What should I do? Please cast your vote in the poll at the end of this post!

Subway Tile
Via
Carrara Marble Subway Tile 
Via

Statuary white marble herringbone tile
Via

Hexagon Marble

Greecian Interlocking Marble
Via


Which backsplash should I go with?

Saturday, April 11, 2015

Kitchen LOVE- updated IKEA play kitchen

To say that I am excited about our new play kitchen is an understatement!


The back splash went in a few weeks ago and I LOVE it. It wasn't the most economical of choices but totally worth it in my mind. I purchased five Smart Tiles from Home Depot.
They were sooo easy to install as they are ADHESIVE!!! All I had to do was peal the backing off and stick to foam-core poster board.


After I had the tiles perfectly lined up to fill in the open area between the counter-top and top cabinet Matt used a staple gun to affix the foam-core to the kitchen. 


Total cost for the "tiles" came to almost $40 .... again not the most economical option but the ease made it worthwhile.

Here are more photos of the kitchen

Love the play food from IKEA.
 

More food stored underneath

Adore that the burners really light up.

Again it is pretty much perfection!

Thursday, March 5, 2015

Kitchen Issues

Right up front I will fully admit that I have issues people! I am aware and I accept the fact that I have the need to update everything in my life... I cannot just let something be...

Case and point.. I wanted to buy a kitchen for Hunter and I wanted it to go in my kitchen... So I needed something nice... Well homeboy's kitchen is now just about the nicest thing in my house!!!


AND it isn't even done yet! This weekend I have plans to add some backspash... again I have issues!

I originally started with the IKEA DUKTIG play kitchen:
  
First step was to cover the counter-top with "marble" contact paper purchased for $10.99 from Amazon. 

The rest of it was painted with Annie Sloan Paris Gray chalk paint.

I decided on chalk paint for two reasons... I already had it and it sticks great to laminate. There was no need to sand or prime the surface! SO EASY!

Here is was with just the base...

And again with the top hutch attached:


Additional plans for the kitchen include the "tile" backslash... I actually already purchased these adhesive "tiles" from Home Depot... Just need to attach them to a foam-core board and it will go on the opening between the base & hutch:

I'm also thinking that I might update the handles... cannot wait to share the finished product next week!

Thursday, February 6, 2014

The Drama that is our Kitchen Rug

I LOVE the runner that I purchased in India during a work trip a few months ago...
 
HOWEVER, I hate that I always walk into the kitchen to this....


Sophie will run in the kitchen and woosh the rug will become displaced. I had previously purchased some Anti-slip rubber tape that attaches to the bottom of the rug which helps a little but I'm still continually adjusting the rug. I'm straightening it about 10-15 times a day and it drives me CRAZY!!!

So Matt did some research and purchased carpet tape from amazon.


We wanted to make sure that everything stuck perfectly so step one was to pull up the rug and sweep/mop the floor.


Next, I removed the old rubber tape from the rug

vacuumed the bottom and affixed the double-stick rug tape.


After the tape was secured to the rug I had Matt help me with the final step of removing the other side of the tape and securing that to the floor in the kitchen. It was extremely helpful to have another set of hands to make sure that the rug was being secured to the floor straight.


We were not worried about using the tape on our hardwood floor because we had actually used this product with success on another rug in our house and when removed there were no marks or damaged items. In fact you would never have known that the tape had been there.


We did this fix on Sunday and lived with it for a few days and so far so good!!! It has worked out perfectly and I'm no longer straightening the rug a million times a day!

YAY for seeing this each time I walk into the kitchen.